Saturday, March 29, 2014

Beautiful Handmade Flowers

This week I'm going to share my handmade flowers. I just want to show how amazingly gorgeous they are we'll see if  you guys will agree with me (ha-ha).I made some of this over the year and I'm still making more in addition to beautify my home.
This flower called "LILY" I already showed one of this on my latest post in my recycled vase to show how pretty the vase with the flowers in it. But this time just the flower itself in different colors.
PINK
These pink ones are nice to decorate on different occasions as a center piece, especially to those who love pink this is perfect for you.
I combined the mint green and the yellow paper to make a yellow green leaves on this one above.
Pink in darker shade of green leaves
These flowers looks real in a distance, you can't even tell that it's made of paper. Just don't expose them to direct sunlight and water so that it won't ruin the whole thing.
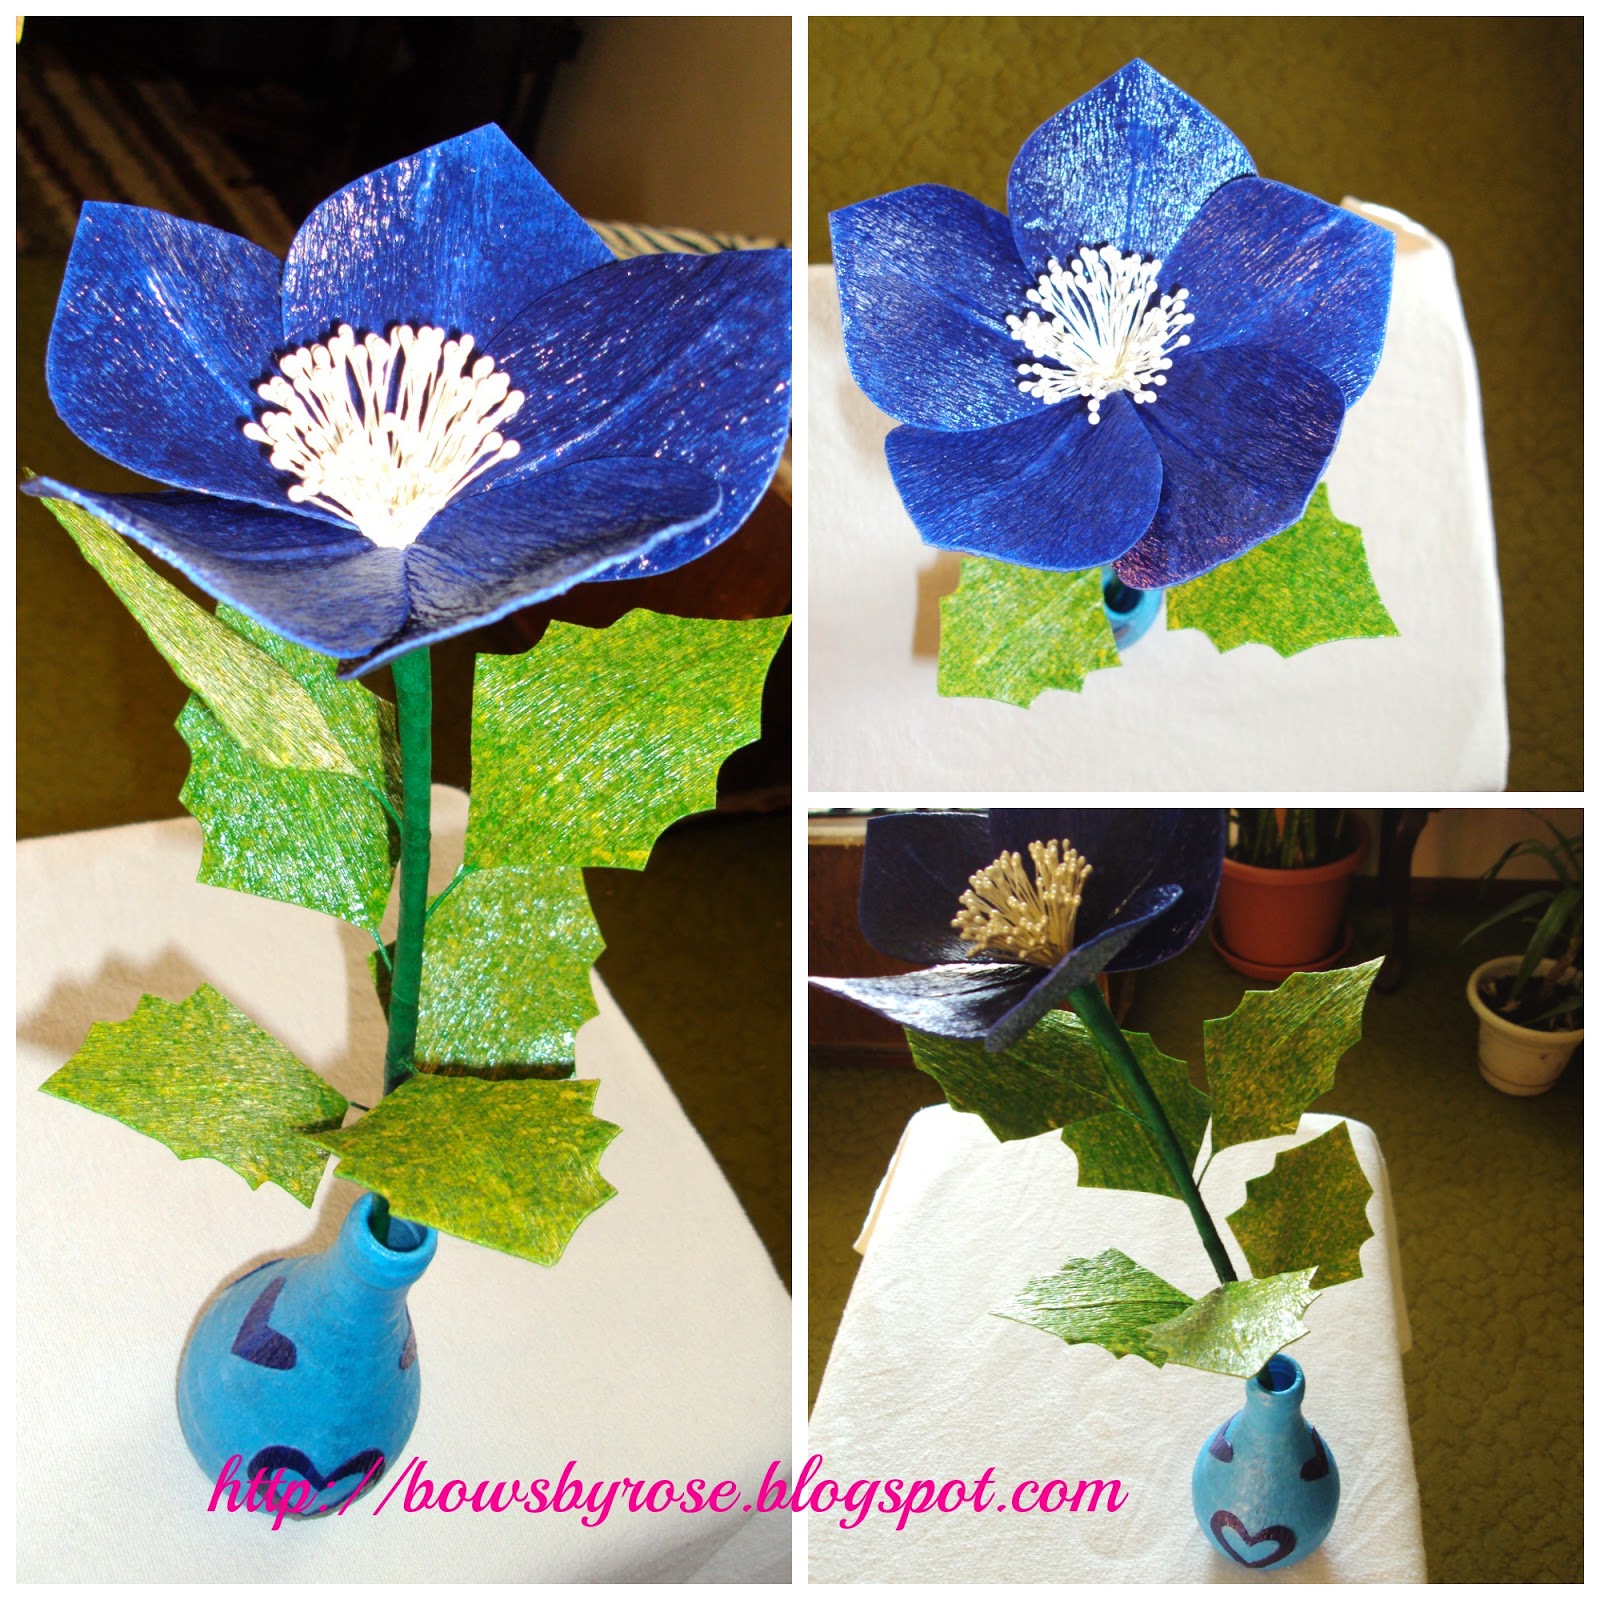
Blue and white combination 
I figure out that when you put white on the top layer of the blue it will create a white spots, so as the leaves just put green on top of the yellow for green spots, it did a very nice effects when you know how to combine the colors, But it took awhile though to test for color combination but once you got it,it's beautiful and I love it. 
The colors below, I just want to try it in different shades to see what they looks like but I haven't put leaves on this ones except the one above the light blue one, because I'm still thinking what color shade to make as a leaves.
You can make leaves in different colors you know, not just green only. Here in the u.s. in the "FALL" season you can see various kind of leaf color, from green turned into yellow, orange, red  and brown before it fell to the ground. That's what I love about "FALL" also to see the beautiful trees with different color of leaves. It's gorgeous! 
Orange and Green
It took me about two days to finish just one flower because of polishing and assembling it. For the polish it took longer to dry out and you have to apply them couple times for the best result and to assemble it you have to be patient for aligning and tying up. It also need a lot of strength in tying it up because you want it to be tight enough, because it won't be look good if it's wobbly.  
Here I put them together in one big vase and use it as a center piece on my table at home, You can place them on the end tables, on top of the shelves, in the kitchen, and by the piano. You can even put it in the bedroom or anywhere in the house and even on the wall, just make sure they look good and blend in where ever you want to use it as a decoration.
 
To all my readers and followers thank you for stopping by, come and visit again next time for more exciting handcrafts ideas.
 
GOD BLESS YOU ALL! 


Tuesday, March 25, 2014

Recycled Vase

 
Just want to show my other DIY stuff that I did, A vase made of recycled bottles. I thought it's pretty neat and a good idea. What is nice about this is you recycle the bottle and use it for something else instead of throwing it away.

 soda water bottle
beer bottle
orange juice bottle


another juice bottle
 
There are plenty of bottles that are formed differently like it shown above so,you can choose the one that you like and wrap it with crepe paper. I use glue to stick it on the bottle and when its well wrapped you can cut any designs to put on it. Then afterwards polish it with clear varnish to look shiny, varnish also holds the crepe paper together so that it won't come off easily. This kind of vase you have to be very careful not to expose it with water or any liquids because its wrapped with paper the designs and the paper itself will melt or spoiled when it gets wet.
 
You can either use artificial flower to put in it or any flower arrangement that doesn't need water. But if you really want to use fresh flowers and put water in it make sure that the outside part of the bottle won't get in touch with water.
  
TIPS:
  1. Make sure the flowers are not too heavy or else the vase will tip over, but just in case it is heavy put some stones or marbles inside the bottle.
  2. Do not expose to direct sunlight because the  crepe paper will fade.
  3. Do not place the vase on any wet surfaces.
  4. Need to wrap the bottle in multiple layers for best result.   
 
 
Here's how I use the vase, I made the flowers as well. For me I think it look nice a handmade vase with my handmade flowers. All this things I learned way back home when I was studying vocational courses, I choose to learn different kinds of crafts which I love to do that includes my bow making and gift wrappings.
I also known as one of the best student in class because of my neat creations and unique hand techniques. It might look easy to see but seriously it's quite hard to do manually. I'm just thankful that I still remember doing this until now because I don't have any notes for all this I just remember it by heart.
That's why I keep making them to help myself to remember everything  I learned in school, and the one that I made I gave them to somebody as a gift like Mother's Day. And now I will share it to my readers and followers of this blog.
 
This  is my handmade crafts for this week see you again next time for more handmade stuff and ideas.
Any questions and suggestions feel free to comment below
 
Thank You and have a great day ahead!


Sunday, March 16, 2014

Saint Patrick Day Parade 2014

Finally Saint Patrick Day is here and we watch the parade as we normally do every year. Although we didn't get there on time because of the traffic and it was already started when we get there but we still get to see the rest of it.
It was sunny and really nice day out except it was cold especially the wind blows so hard and it getting intense as we stood there longer by the road where they held the parade. It took about an hour and a half before it was over so we were shivering for a while.
Here are some clips that I took during the parade
PART 1
This clip is not the first part of the parade because I was late about 10 minutes so I took the video from this part until the end but this is my part 1 video there are more coming up.

PART 2
This part where you can see a band playing with different kind of musical instruments, you can see also a different kind of mascots and a huge blow up shamrock leaf.
 
PART 3
Clowns and kid bikers
One of the clown is funny he try to be a magician and shouted to the people to watch him do the his trick (he goes watch, watch, watch and then he pulled out the watch under the red cloth on his hand that was hilarious).I like this part also.
 
PART 4
You can see a marching band here playing bag pipes and a statue of liberty mascots. Lot of them handling out candies and flyers to the spectators too.
 
 
PART 5
a fire truck, another mascots and a blow up shamrock balloon
 
 
PART 6
Twilighters
 
 
PART 7
This is the last part and the best part that I like the most where you can see horses, pedal wagon, another band and a ginormous blow up bear, it's super tall they even have to pull it down to pass thru the stop light.
 
It was really a fun event, next year I will make sure I wont be late so that  I will be able to see the entire parade. It's worth watching it even it was cold, we still had fun.
 
Maybe some of you don't want to watch the videos so here are some pictures.


Just want to show here my little pumpkin wearing her Saint Patrick outfit, this clothes I already posted it  on my "Getting ready for Saint Patrick's Day" post but  she's wearing it this time.
It is so big for her especially the pants so I changed  her pants to a smaller one
This is the best shots I could get because she is moving around I couldn't get her to sit still, this one here she is practicing her karaoke I think I'm bothering her that's why she keep turning away from me.
 
 So that was the Saint Patrick Parade all about see you again next time and have a happy weekend everyone!
 

Sunday, March 9, 2014

Baby Bonanza & Kid's Expo

Diaper Derby Race Winner
We went to baby bonanza and kid's expo today just to get out the house and check out if there is something interesting going on out there and I'm also thinking that it would be good for carly(my daughter)to be there and socialize with other kids.
They do have a lot of booths set up where you can shop and check different kind of information about baby's, kid's and even expecting mothers. They also have sort of games on the stage where babies and parents can participate and have fun, Unfortunately as I get on stage the game is over ha-ha we didn't get on time but that's okay.
So we continue browsing every booths, we bought some stuff and take pictures with any mascot's that we saw.
 
 ELMO
Lil kicker's soccer rabbit
We got tired walking around so we decided to get some food and will continue browsing afterwards. We sat down and eat, while we are eating I saw a father put his kid down on the floor that has mat with numbers and finish lines written on it and let him crawl. so, I was curious, I finish my food fast and get in there with carly too.
 
I put carly down and let her crawl while her daddy taking a video, she did pretty good because she's been practicing a lot at home following me around. While my husband looking around he notice that there will be a race for babies no wonder there are numbers and finish lines on that mat because that's what are for. So I hurriedly registered carly to join in I'm thinking it's gonna be fun, and here she is #92.
 
 
We are waiting for the other participants to be ready but carly is ready to go we can't wait.
Let's the show begin please watch
 
 
She won yay! good job honey and here we are claiming our prize
 She got a trophy
 I am so happy for her achievement that day, can you imagine a trophy at her age I never expect that I'm such a proud momma ha-ha.


When we got home we can't get over it for a while and watch the video over and over on TV. That was so much fun. I will definitely go back again next year just to watch because carly will be walking on that time for sure so she's not allowed to join the race anymore, but we can join other activities that they have.
 
That was our weekend adventure, How about you guys how did your weekend goes?


Wednesday, March 5, 2014

Handmade Paper Bags

Beside bows I also make paper bags made of poster board and gift wrappers, you know how expensive paper bags are in the store so I tried to make some for myself to use for different occasions or just to put some small things in. If I don't do fancy gift wrappings I can just use my handmade paper bags which I designed by myself too, although the designs are not pretty like in the store at least I try to be creative and make it in my own way.
HERE ARE SOME OF THEM


I folded and measured the bags first and I use a cut out flowers or any pictures from wrapping papers and paste it on the plain bag to make it look nicer.
 I'm very crafty and want to learn everything handmade stuff as I could especially if I can make money out of it, you will never know I'm going to have my own gift shop someday(haha in my dreams).
 
 
Above are the bags with bows on it
 
Here are the wrapping papers, some bags I designed for wines and for gift cards you just fold and measured it base on the size of the stuff that you want to put in, For the handle you can use either a paper twine or a string. It's not that really hard to make a bag, for me I think its faster and easier than to make a bow.
 TIPS:
  1.  Making a bag using a wrapping paper need to double the paper if you wish to put a  heavy stuff in so that it will hold the things that you put in it.  
  2. Use puncher to make a hole where you insert the string handle
  3. Tie a knot on both ends of the  string to hold it in place when inserted it in the holes
  4. Measure the string on your desired length
  5.  Put cardboard or poster board at the bottom inside the bag to make it sturdy        
I'm open for any suggestions and advices so feel free to comment below if you have any tips and ideas to suggest about my creations, I will be happy and will appreciate it so much.  Thank You! See you around.